20+ years of driveway DIY auto work — oil changes, brakes, rotors, and restoration
Updated July 202611 min read
As an Amazon Associate, This Will Fix It earns from qualifying purchases at no extra cost to you. Recommendations are based on expert review sources including Car Talk, The Motor Guy, AutoGuide, and verified Amazon buyer reviews.
80%
Drop in light output from heavily oxidized headlights vs new — AAA research
$20
Cost of a quality restoration kit vs $250–$700 for headlight assembly replacement
45 min
Average time per headlight with a drill-based kit — both headlights in under 2 hours
Best pick for most driveways — start here
3M Headlight Lens Restoration System
The most consistently top-rated headlight restoration kit across expert review sources in 2026. Progressive sanding from 500 to 3000 grit using drill attachments cuts through heavy oxidation that hand-polish kits can’t touch. Includes UV protective coating wipes. Car Talk, The Consumer’s Guide, and The Motor Guy all rate it as the best drill-based kit for severe yellowing. If your headlights are more yellow than cloudy — especially on a vehicle that’s 5 or more years old — this is the kit to reach for.
Car Talk top pickProgressive 500–3000 gritDrill-based~$20
Problem
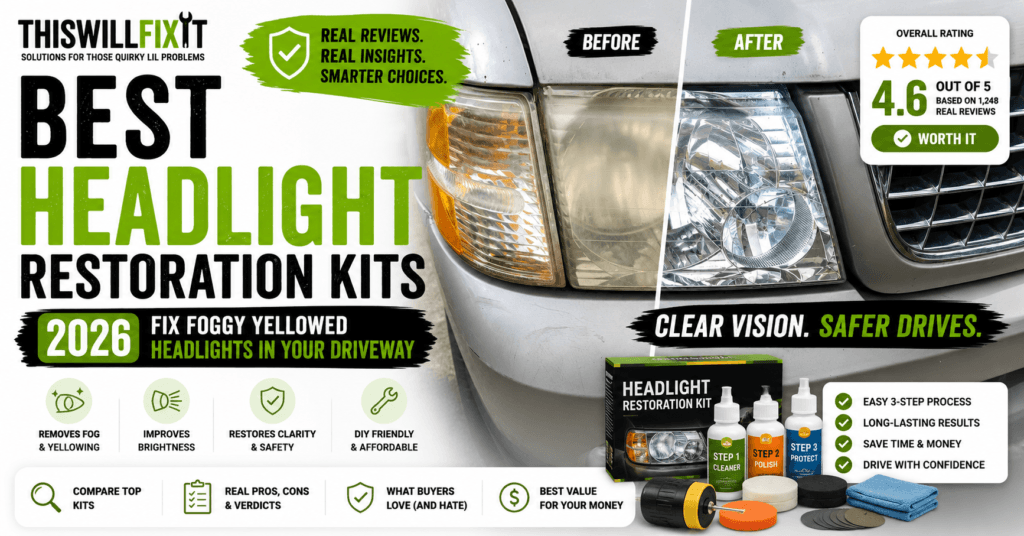
Yellowed, hazy headlights that cut your nighttime visibility by up to 80% — and make a car look 10 years older than it is. New assemblies cost $250 to $700 each at a dealer.
Fix
A $15 to $30 restoration kit that sands off the oxidized outer layer, polishes to clarity, and seals with UV protection — in your driveway in under 2 hours with no special skills.
Relief
Clear headlights that dramatically improve nighttime visibility, make the car look years younger, and stay clear for 12 to 24 months before the next maintenance coat.
Why Headlights Go Yellow and Foggy — and Why It’s a Safety Problem
Every modern car uses polycarbonate plastic headlight lenses — not glass. Polycarbonate is lightweight and shatter-resistant, but it degrades under UV exposure. From the factory, a UV-protective clear coat is applied to the lens surface. That clear coat typically holds up well for 3 to 5 years. After that, UV rays start breaking down the plastic beneath it — causing the yellowing, hazing, and cloudiness you see on any vehicle that’s spent a few years in the sun.
According to AAA research, heavily oxidized headlights can reduce effective light output by over 80 percent compared to clear lenses. That’s not an aesthetic problem — it’s a genuine safety issue. Less light output means shorter reaction distances on dark roads, reduced visibility in rain and fog, and a vehicle that’s harder for other drivers to see. I’ve seen this on vehicles I’ve worked on in my own driveway: a headlight that looks gray from 10 feet away often looks clear from the driver’s seat until you actually park next to a car with new headlights and compare.
The good news is that the oxidation is almost always on the outer surface of the lens — not inside the housing. A restoration kit removes that oxidized layer through sanding and polishing, then seals the fresh plastic with a new UV coat. The whole job takes under two hours per car and costs $15 to $30 in materials.
Drill vs No-Drill — Which Type of Kit Do You Need?
If your headlights are
Heavily yellowed, brown-tinted, or badly oxidized — 5+ year old vehicle
→ Drill kit: 3M or Meguiar’s Heavy Duty — aggressive sanding cuts deep oxidation faster and more consistently than hand application
If your headlights are
Mildly cloudy or hazy — 3 to 5 year old vehicle
→ No-drill kit: Sylvania or Meguiar’s Two-Step — hand application works well on surface haze and is significantly easier
If you
Don’t own a drill or don’t want to use one
→ Sylvania kit — specifically engineered for hand application, surface activator reduces sanding effort significantly
If you want
Longest-lasting results — 2+ years between treatments
→ Chemical Guys Ceramic Kit — ceramic coating bonds to the plastic rather than sitting on top, lasting significantly longer than standard UV sealants
If you want
Cheapest entry point that actually works
→ Meguiar’s Two-Step (~$12) — no sanding, no drill, produces real results on mild-to-moderate cloudiness
If you’re doing
Multiple vehicles or maintaining results year to year
→ 3M kit for full restoration + Meguiar’s Keep Clear Coating spray (~$8) for annual maintenance coats
5 Best Headlight Restoration Kits — 2026 Comparison
Kit #1: 3M Headlight Lens Restoration System — Best for Heavy Oxidation
Kit #1 — Top Pick · Car Talk · Consumer’s Guide · Motor Guy
3M Headlight Lens Restoration System
~$20
The kit most consistently rated first or second by expert sources for drill-powered headlight restoration in 2026. Uses 3M’s Trizact sanding technology with three progressive grits — 500, 800, and 3000 — to remove oxidation in stages, with each grit eliminating the scratches from the previous one. The drill attachment means even pressure and consistent results without the fatigue of hand sanding on stubborn oxidation. Includes UV protective clear coat wipes as the final step. Car Talk’s testing found it delivered clarity comparable to the Mothers NuLens kit, which they rate #1 overall but note is more expensive. The Motor Guy calls the Trizact sanding discs “magical” for the way they cut through severe oxidation without aggressive pressure.
Best results on severe yellowing and heavy oxidation
Drill attachment ensures even pressure — consistent results
Progressive grit system removes deep oxidation in stages
UV clear coat wipes included — don’t need to buy separately
Trusted 3M quality — widely available and well-supported
Watch-outs
Requires a standard corded or cordless drill
Some users report disc grit numbers are hard to read if cut off in production
UV coat durability is 12-18 months — plan for annual maintenance
Scott’s tip: Keep the sanding disc and the lens surface wet throughout every sanding stage — spray water on both before each pass and re-wet every 30 seconds. Dry sanding clogs the disc fast and creates heat that can micro-scratch the lens in ways that are hard to polish out. I keep a spray bottle of plain water in my hand the whole time. Also: tape generously — at least 2 inches past the lens edge on all sides. Restoration compound will permanently stain some paint finishes if it contacts them.
Sylvania Headlight Restoration Kit — No Tools Required
~$15
Car Talk’s AAA testing partner John Paul rated the Sylvania kit highest for long-lasting results among the kits he tested — specifically citing the UV Block Clear Coat as the most durable protective layer in any hand-application kit. What makes Sylvania different is the Surface Activator — a proprietary solution applied before sanding that chemically softens the plastic, making hand sanding significantly easier and producing more consistent results than trying to hand-sand without it. No drill required. This Old House Reviews noted that Sylvania’s included applicator pads generate enough consistent friction for 80 to 90 percent clarity restoration on mild-to-moderate oxidation without power tools. Good choice for first-timers and anyone without a drill.
No drill requiredSurface activator stepAAA tested — best durabilityCar Talk recommended
Scott’s tip: The Surface Activator step in the Sylvania kit is the one most people are tempted to skip because it seems like an extra step with unclear purpose. Don’t skip it. It’s the reason this kit works by hand — it softens the oxidized plastic layer so the sanding compound cuts through it with normal hand pressure instead of needing a motor. Apply it, wait the full dwell time on the instructions, then start sanding. The difference is immediately noticeable in how the compound cuts.
Kit #3: Meguiar’s Heavy Duty Kit — Best for Severely Neglected Headlights
Meguiar’s Heavy Duty Headlight Restoration Kit
~$30
Meguiar’s formulated PlastX polish specifically for polycarbonate headlight lenses — not general automotive plastic — which is why Forbes Wheels noted it leaves noticeably less micro-scratching than generic abrasive systems at the polishing stage. The Heavy Duty kit includes 1000 and 3000 grit sanding discs, a drill backing plate, a wool polishing pad, PlastX compound, and Meguiar’s proprietary Headlight Coating sealant rated for up to 12 months of UV protection. Best choice for headlights that have been neglected for years — brown-tinted, heavily scratched, or with multiple layers of oxidation that lighter kits struggle to cut through in a single session.
Kit #4: Meguiar’s Two-Step Kit — Fastest, Easiest, No Sanding
Meguiar’s Two-Step Headlight Restoration Kit
~$12
The lowest-effort option on this list — a cleaning wipe followed by a coating wipe, both pre-saturated. No sanding, no drill, no compound, no mess. Works on mild-to-moderate surface cloudiness where the lens hasn’t oxidized deeply. Car Talk recommends it specifically for drivers who don’t want to sand or use a drill. Reviewers on Amazon consistently describe results as “easy application, went from dull and cloudy to clear and shiny.” The coating provides UV protection. The limitation is predictable: it will not cut through heavy yellowing or deep oxidation — for that, you need a sanding-based kit. At $12, it’s the right first attempt before committing to a full sanding kit.
No sandingNo drill2-step wipe systemBest for mild cloudiness
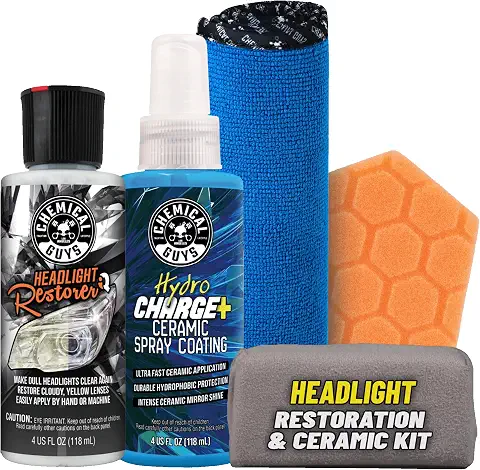
Kit #5: Chemical Guys Ceramic Kit — Longest-Lasting Protection
Chemical Guys Headlight Restoration + Ceramic Kit
~$25
The distinction here is the HydroCharge ceramic coating that’s applied after restoration. Standard UV sealants sit on top of the plastic surface and wash away or break down over 12 to 18 months. Ceramic coatings chemically bond to the polycarbonate at a molecular level — becoming part of the lens surface rather than a coating on top of it. The result is protection that typically lasts 2 to 3 years rather than 1 year. The restoration compound is applied by hand or machine. This is the right choice for drivers who want to do the job right once and not think about it for a couple of years rather than touch up annually.
Ceramic bonding2–3 year protectionHydroCharge coatingHand or machine
Watch-out — the UV coating step: Every headlight restoration kit includes a UV protective coating as the final step. This step is not optional — it’s what determines how long the results last. Without a UV sealant, the freshly sanded and polished plastic has zero UV protection and will start re-oxidizing within weeks in direct sunlight. I’ve seen people skip the coating because the headlight looks great after polishing and they assume the job is done. Six months later it’s cloudy again and they think the kit didn’t work. The kit worked fine. The coating step was skipped. Apply it, let it cure fully, and the results will hold for 12 to 24 months.
How to Restore Headlights Step by Step — Full DIY Guide
What you need before starting:
Headlight restoration kit (your pick from above)
Painter’s tape — low-tack, 2-inch wide
2–3 clean microfiber towels
Spray bottle of plain water
Nitrile gloves (for the coating step)
Drill (for drill-based kits only)
1
Wash and completely dry the headlight
Soap and water, rinse thoroughly, dry with a microfiber towel. Any road grit left on the surface scratches the lens during sanding. Do this in shade or on a cloudy day — sanding compounds dry out faster and work unevenly in direct sun or high heat.
2
Tape generously around the lens
Apply painter’s tape at least 2 inches past the edge of the headlight lens on all sides — covering paint, trim, chrome, and grille. Sanding compound and UV coatings will permanently stain some paint finishes if they make contact. Take 5 minutes to tape properly. It’s faster than fixing paint damage.
3
Apply Surface Activator (Sylvania kits only)
If you’re using the Sylvania kit, apply the Surface Activator to the lens and wait the full dwell time specified in the instructions before sanding. This step chemically softens the oxidized plastic layer — skipping it means the hand sanding requires significantly more effort and produces worse results.
4
Sand with coarsest grit — keep everything wet
Wet the sanding disc and the lens. Sand in consistent horizontal strokes across the full surface until the lens looks uniformly frosted — that uniform frost means the oxidized layer is fully removed. Keep spraying water on the disc and lens every 30 seconds. Wipe dry and inspect. If you see shiny spots (un-sanded areas), keep going until the frost is fully even.
5
Progress through each finer grit — change direction each time
Switch to the next finer grit and sand in vertical strokes. The change in direction lets you see when the previous grit’s scratches are fully removed — you’re done with that grit when you can no longer see lines running in the previous direction. Repeat for each progressively finer grit. The lens looks increasingly cloudy as you go through the grits — that’s correct and expected.
6
Polish to clarity
Apply the polishing compound to the foam or wool pad. Work in overlapping circular passes — by hand or by drill at 1200 to 2500 RPM. The lens will visibly clear as you work. Wipe off residue with a clean microfiber towel after each pass and check the clarity. If you still see haze, apply more compound and continue. Don’t rush this step — it’s where the final clarity is achieved.
7
Apply UV coating — do not skip this
Put on nitrile gloves. Apply the UV sealant, ceramic coating, or clear coat wipe per kit instructions — working evenly across the full lens surface. Allow to cure completely before driving in rain. The curing time varies by kit — check the instructions. This step is what determines how long your results last. Plan annual re-application of UV coating to extend the life of the restoration.
Scott’s tip: If you want the results to last 2 to 3 years instead of 1, finish the job with a can of Meguiar’s Keep Clear Headlight Coating ($8 on Amazon) even after using a different kit’s included sealant. Spray it on as an additional top coat once the kit’s coating has cured. Then reapply it once a year every spring as a maintenance coat — 5 minutes per headlight. This is the single biggest thing you can do to extend how long headlight restoration results last without redoing the full sanding process.
Related fix: If your headlights are clear but your car has other exterior issues — water spots, light paint scratches, or oxidized trim — the same tools and techniques from headlight restoration apply. Our guide to all auto solutions and driveway DIY fixes covers the full range of car maintenance you can do yourself without a shop.
Common Questions About Headlight Restoration Kits
For most drivers with moderate-to-severe oxidation, the 3M Headlight Lens Restoration System is the top-rated kit in 2026 according to Car Talk, The Consumer’s Guide, and The Motor Guy. It uses progressive sanding from 500 to 3000 grit with drill attachments that deliver professional-level clarity on even heavily yellowed lenses. For drivers without a drill, the Sylvania Headlight Restoration Kit is the best no-tools option — AAA testing rated it highest for long-lasting results among hand-application kits.
Results depend almost entirely on whether the kit includes a UV protective coating and whether you apply it as the final step. Kits with strong UV sealants — Sylvania (12-18 months), 3M with added clear coat (12-18 months), and ceramic coatings (2-3 years) — deliver significantly longer-lasting clarity. Kits without UV protection may cloud again within 3 to 6 months. The UV coating is the most important step — skipping it means redoing the job within a year regardless of how good the sanding and polishing were.
Yes. The Sylvania kit and Meguiar’s Two-Step Kit are both designed for hand application with no drill required. Sylvania uses a surface activator that chemically softens the plastic before hand sanding — reducing effort and producing results comparable to drill kits on mild-to-moderate oxidation. For severely yellowed or brown-stained headlights, a drill-powered kit like 3M or Meguiar’s Heavy Duty will produce better results faster.
Modern headlight lenses are made from polycarbonate plastic with a factory UV-protective clear coat that typically lasts 3 to 5 years. Once that clear coat breaks down, UV rays oxidize the plastic beneath it — causing yellowing, hazing, and cloudiness. The oxidation is almost always on the outer surface only, which is why a restoration kit can fix it without replacing the lens. The plastic underneath is almost always structurally fine.
A DIY restoration kit costs $15 to $35 and takes 30 to 60 minutes per headlight in your driveway. Professional shop restoration runs $80 to $200 per vehicle. Headlight assembly replacement at a dealership typically costs $250 to $700 per assembly depending on the vehicle. For the vast majority of oxidized headlights, a $20 restoration kit delivers 80 to 90 percent of the clarity of a new lens for a fraction of the cost.
Sanding kits physically remove the oxidized outer layer using progressively finer abrasives, then polish and seal. Chemical no-sand kits use an oxidation-removing compound without sanding. Sanding kits produce deeper clarity and better results on heavy oxidation. Chemical kits are easier and faster but work best on mild-to-moderate cloudiness. Most expert testers recommend sanding kits for any headlight with visible yellowing or brown tinting — not just surface haze.
20+ years of driveway DIY — oil changes, brakes, rotors, filters, belts, and exterior restoration
Headlight restoration is one of those jobs I do every few years on every vehicle I own — it takes less time than an oil change and makes a bigger difference in how the car looks and how well you can see at night. The kits and tips on this page are what I’d tell someone in my driveway. Read more about Scott’s approach →
Ready to clear up those headlights?
Start with the 3M kit for heavy oxidation or the Sylvania kit if you don’t have a drill. Either way — tape generously, keep everything wet, and don’t skip the UV coating at the end.