DIY mechanic — 20+ years changing his own oil and brakes
Updated May 20268 min read
As an Amazon Associate, This Will Fix It earns from qualifying purchases at no extra cost to you. We only recommend products we’d actually use — and I’ve done my own oil changes for over 20 years.
$75+
Saved per oil change vs. a shop
30 min
Average DIY oil change time
$15
Average cost of a good drain pan
Our top pick — 2026
NEIKO 20761A 4-Gallon Anti-Splash Drain Container
The most reliable all-rounder for most passenger cars and SUVs — anti-splash lip, built-in pour spout, thick-walled polythene that handles hot oil without flexing. Under $15 and built to last for years of changes.
Best for: most cars & light trucksCapacity: 16 quarts (4 gallon)Price: ~$12–15
Problem
Oil spills on the garage floor, a pan that overflows, or used oil that sloshes everywhere when you try to move it — making the whole job messier than it needs to be.
Fix
The right drain pan for your vehicle’s oil capacity — with an anti-splash lip, a pour spout, and enough capacity that you’re not scrambling mid-drain.
Relief
A clean driveway, contained used oil ready for recycling, and a job done right in under 30 minutes without the mess that makes most people give up on DIY oil changes.
Why the Right Drain Pan Makes or Breaks a DIY Oil Change
I’ve been changing my own oil for over 20 years — on daily drivers, project cars, and everything in between. The one thing that separates a clean, satisfying oil change from a frustrating mess isn’t technique or experience. It’s whether you have a drain pan with enough capacity, a proper pour spout, and an anti-splash lip that keeps hot oil from bouncing out when the drain plug lets go.
Most people undersize the pan. They check their car’s oil capacity — say, 5 quarts — and buy a 6-quart pan. Then the oil filter housing drips an extra quart when they unscrew it, and the overfill goes straight onto the garage floor. The fix is simple: always go at least 2 quarts over your engine’s rated capacity, and make sure the pan has a spout wide enough to actually pour used oil cleanly into a recycling container.
The three picks below cover every scenario — passenger cars and SUVs, full-size trucks and diesel engines, and a budget option for occasional DIYers. I’ve selected them based on capacity, build quality, and whether the pour spout actually works without making a second mess.
Pick Your Pan by Vehicle Type
If you drive
Passenger car (4–6 qt oil) → NEIKO 12-quart
Covers most 4-cylinder and small 6-cylinder engines with room to spare
If you drive
Full-size truck or SUV (8–10 qt) → OEMTOOLS 24-quart
Large V8 and diesel engines need capacity — a 12-quart pan will overflow
If you drive
Diesel truck (12–15 qt) → Lisle 45-quart rolling pan
High-capacity rolling design for big engines or multi-vehicle garages
If you want
Budget option → WirthCo 32953 Funnel King 4-gallon
Made in USA, chemically resistant, adequate for most cars under $15
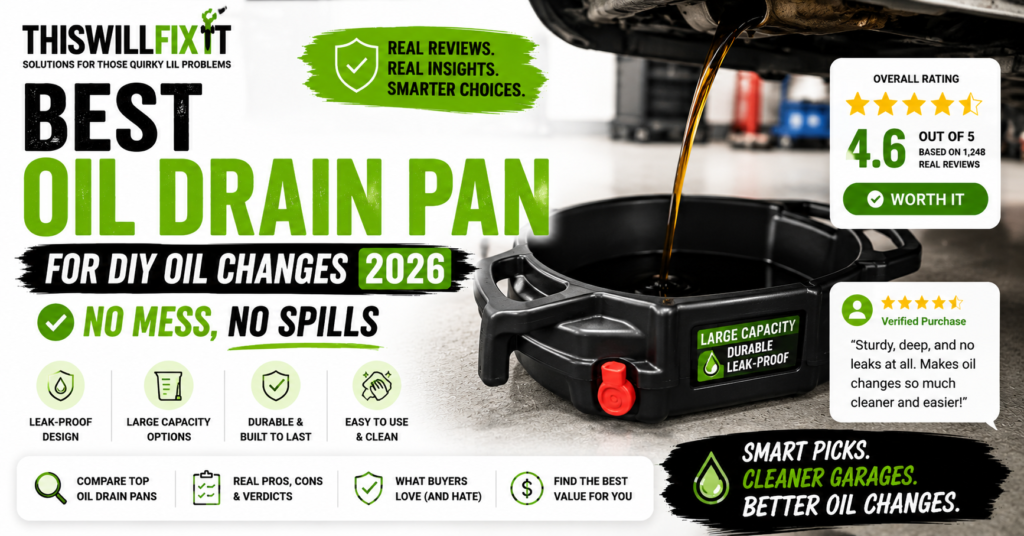
Our Top Pick: NEIKO 20761A 4-Gallon (16L) — Best for Most Vehicles
NEIKO 20761A 4-Gallon Anti-Splash Drain Container
~$12–15
Thick-walled recyclable polythene that stays rigid when filled with hot oil straight from the drain plug. Anti-splash lip keeps oil contained when the plug releases. Built-in pour spout for clean transfer into recycling containers. Handles motor oil, coolant, transmission fluid, and antifreeze without chemical degradation. Under $15 and built to last years of oil changes.
4-gallon (16L) capacityAnti-splash lipBuilt-in pour spoutChemical resistantUnder $15
The NEIKO pan earns its reputation for one simple reason — it does everything right without overcomplicating the job. The walls are thick enough to stay rigid when you’re carrying 10 quarts of hot oil across a garage, which matters more than most people realize until they’ve had a flimsy pan flex and slosh on them. The anti-splash lip is a real feature, not just marketing copy — when the drain plug fully releases, hot oil hits the pan with force, and without that lip it bounces out.
The pour spout is the other thing NEIKO gets right. Most drain pans have a tiny raised lip they call a spout that still makes a mess when you tilt the pan. The NEIKO spout is wide enough and shaped well enough that you can actually transfer used oil into a jug without drips. For a $13 tool that I use every 5,000 miles, that level of attention to the basic function is what keeps it in my garage rotation.
Scott’s tip: Slide the drain pan in at a slight angle so the deepest point is directly under the drain plug. When the oil starts flowing it will find the lowest point — if the pan is perfectly flat the oil spreads to the edges and takes longer to drain toward the spout. Tilting it 5–10 degrees toward the spout pools the oil there and makes transfer much cleaner.
Pros
Thick-walled — stays rigid under hot oil, no flex or sag
Anti-splash lip actually contains oil on fast-releasing plugs
Pour spout wide enough for clean transfer without drips
Works for oil, coolant, transmission fluid, and antifreeze
Under $15 — pays for itself on the first oil change
Watch-outs
No lid — can’t seal and transport without a separate container
12 quarts is borderline for big V8 trucks — go OEMTOOLS if you have a full-size
No handles — awkward to carry when full, use two hands
Also Worth Considering
OEMTOOLS 87009 — Best for Full-Size Trucks & SUVs
~$22
Twenty-four quarts handles most full-size trucks, large SUVs, and V8 engines that take 8 to 10 quarts of oil — with enough headroom that a dripping filter housing won’t cause an overflow. Low-profile design improves clearance under vehicles with less ground clearance than a lifted truck. Same anti-splash and pour spout features as the NEIKO but built for heavier-duty applications. If you also do your own brake jobs and other driveway maintenance, this pan handles all of it.
Lisle 19202 Rolling Drain Pan — Best for Diesel Trucks & High Volume
~$65
Forty-five quart rolling container with a sealed lid and spigot for controlled fluid transfer — designed for diesel trucks with 12 to 15 quart oil capacities, commercial shops, or anyone doing multiple vehicles in one session. The rolling design means you’re not carrying 40 pounds of hot used oil across a garage floor. The sealed lid lets you transport it to a recycling center without transfer. Worth every dollar if you have a diesel or do multiple vehicles.
Made in the USA from chemically resistant polyethylene — holds up to 16 quarts, has easy-grip handles, and covers most passenger cars without issue. The square spout is the one weak point — it pours a little less cleanly than the NEIKO — but at the same price point it’s a solid option for occasional DIYers who change oil once or twice a year and want something that lasts.
Watch-out: Never use a drain pan without checking your engine’s oil capacity first. Look it up in the owner’s manual or on the oil filler cap — not online, where the number sometimes reflects the wrong trim level. Add at least 2 quarts to that number when choosing a pan size. Undersizing the pan is the number one reason DIY oil changes end with oil on the garage floor.
How to Do a DIY Oil Change Without Making a Mess
These are the steps I follow every time. The two most common mistakes — positioning the pan too late and not letting the engine warm up first — are both avoidable with a little prep.
1
Warm up the engine first
Run the engine for 2 to 3 minutes before draining. Warm oil flows faster and more completely than cold oil — you get a cleaner drain without waiting for a hot engine to cool enough to work under safely. Two minutes is the sweet spot.
2
Position the pan before you touch the drain plug
Slide the drain pan into position directly under the drain plug with the deepest point centered under it. Tilt it slightly toward the spout end. Do this before you put a wrench on the plug — once the plug breaks loose hot oil comes out fast.
3
Remove drain plug and oil filter
Break the plug loose with a socket wrench, then spin it out by hand — keep your hand on the plug to control the release. Wear nitrile gloves. Let most of the oil drain before removing the filter, which will drip an additional quart when you unscrew it.
4
Let it drain completely — 5 to 10 minutes
Rushing the drain means old oil left in the engine mixes with the new oil you’re adding. Five minutes is usually enough. Use the time to prep the new filter — wipe a thin film of fresh oil around the filter gasket before installing.
5
Reinstall plug and filter, add new oil
Reinstall the drain plug to spec — around 25 to 30 ft-lbs for most passenger vehicles, check your manual. New filter goes hand-tight plus a quarter turn. Add new oil through the top, check the dipstick, run the engine 30 seconds, check for leaks under the vehicle.
6
Transfer used oil and recycle it
Use the drain pan’s pour spout to fill an empty oil jug or sealed container. Take it to AutoZone, O’Reilly, Advance Auto Parts, or Walmart — they accept used motor oil for free. Never dump it on the ground or in the trash.
Next DIY auto fix: If you also do your own brake jobs, the right tools make the job as straightforward as an oil change. Our guide to the best DIY auto maintenance products covers brake bleeders, oil change kits, and everything else you need for driveway repairs.
Common Questions About Oil Drain Pans
Check your owner’s manual for your engine’s oil capacity and add at least 2 quarts of buffer. Most passenger cars take 4 to 6 quarts — an 8 to 12-quart pan covers you comfortably. Trucks, SUVs, and diesel engines often take 8 to 15 quarts, so you need at least a 15 to 20-quart pan. When in doubt go bigger — overfilling a drain pan is impossible, but an undersized one will overflow and create a much bigger mess than the oil change itself.
Take it to any AutoZone, O’Reilly, Advance Auto Parts, or Walmart Tire and Lube — they accept used motor oil for free recycling in most states. Use the pour spout on your drain pan to transfer the oil into a sealed container (an empty oil jug works perfectly) before transporting. Never pour used oil down a drain, on the ground, or into the trash — it is illegal in most states and one quart can contaminate up to 250,000 gallons of groundwater.
Position the drain pan directly under the drain plug before loosening it — once it breaks loose the oil comes out fast. Use a pan with an anti-splash lip. Wear nitrile gloves. Have rags ready for the drain plug threads and the oil filter housing. A no-spill oil drain plug tool like the Fumoto valve eliminates plug-removal spills entirely if you do oil changes frequently.
You can but should not mix them in the same pan at the same time — coolant and oil mixed together creates a hazardous waste that most recycling centers will not accept. Drain and empty the pan completely between fluids. Some mechanics use color-coded pans — one for oil, one for coolant — to prevent cross-contamination.
For trucks and SUVs with 8 to 15 quart oil capacities, you need at least a 20-quart pan. The OEMTOOLS 87009 at 24 quarts handles most full-size trucks comfortably. The Lisle 19202 with 45-quart rolling design is the best option for diesel trucks, large SUVs, or anyone doing multiple vehicles in one session. A low-profile design also helps for trucks with limited ground clearance.
DIY mechanic — oil changes, brakes, and driveway repairs for 20+ years
I’ve been changing my own oil, brakes, filters, and doing small repairs in my own driveway for over 20 years. Every auto recommendation on this site comes from someone who has actually done the job — not someone who read about it. I know which tools make the job cleaner and which ones create more mess than they prevent. Read more about Scott →
Ready to do your own oil change?
The NEIKO 12-quart drain pan is the right starting point for most vehicles — under $15, built to last, and the one tool that makes the whole job cleaner. Check the current price on Amazon.